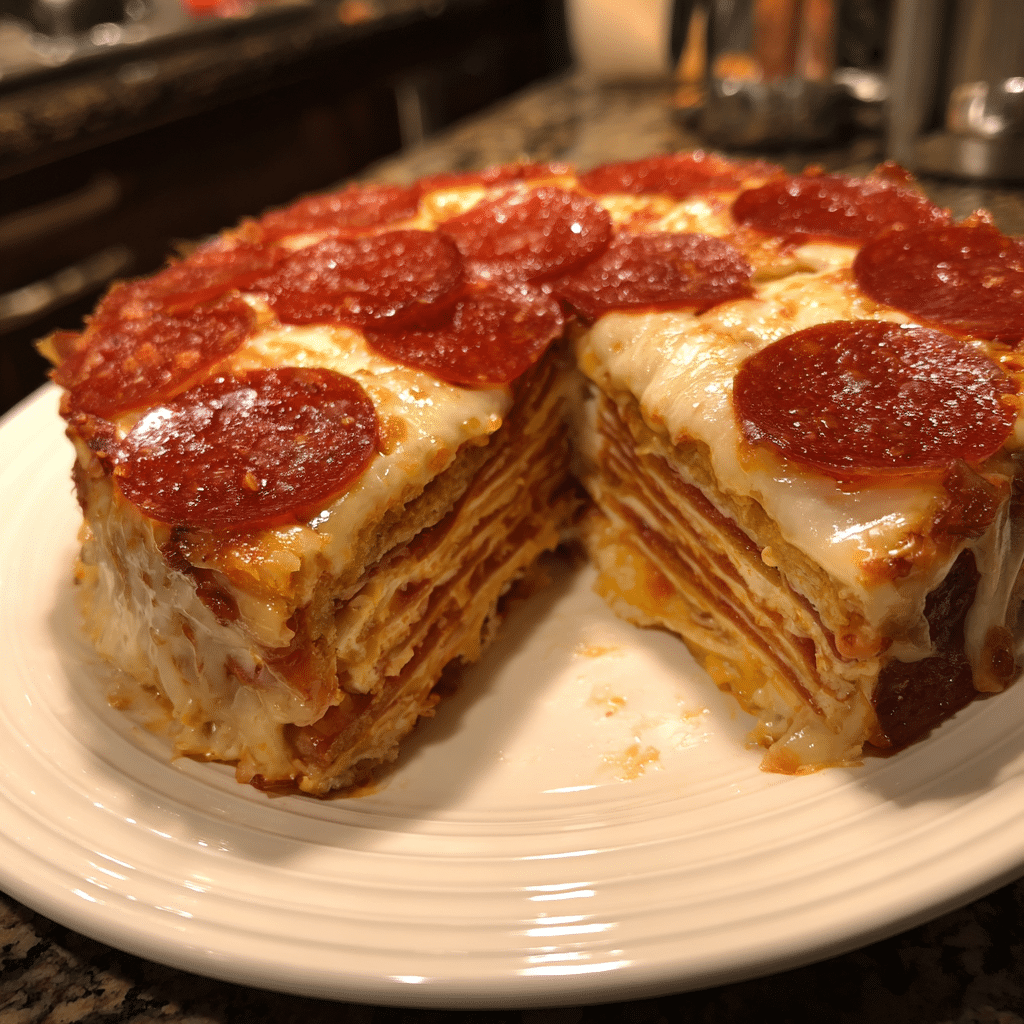
If you think pizza couldn’t get any better, wait until you try this Pepperoni Pizza Layer Cake. Imagine multiple layers of golden crust, gooey cheese, tangy tomato sauce, and crispy pepperoni all stacked into one epic creation. It’s everything you love about pizza—but taller, cheesier, and way more fun. This over-the-top dish is a showstopper that’s perfect for parties, game nights, or any time you want to impress your guests with something bold and indulgent. I tried making this once using a mix of mozzarella and provolone cheese for a deeper flavor, and it turned out beautifully. The best part is slicing through it and seeing all the delicious layers come to life—pure satisfaction in every bite.
Why You’ll Love This Recipe
This recipe takes classic pizza to a whole new level. It’s a creative twist that brings together familiar flavors in an impressive presentation. Each layer of sauce, cheese, and pepperoni bakes together into a gooey, pull-apart masterpiece that’s both fun to make and even more fun to eat. Plus, you can customize every layer with your favorite toppings. Whether you’re hosting friends or treating yourself to a weekend indulgence, this pizza layer cake is guaranteed to wow everyone at the table.
Print
Pepperoni Pizza Layer Cake – A Tower of Cheesy Delight
- Total Time: 1 hour 5 minutes
- Yield: 8 servings
- Diet: Halal
Description
A fun and indulgent twist on traditional pizza — this Pepperoni Pizza Layer Cake features multiple layers of cheesy, saucy, pepperoni-topped pizza stacked together into a towering treat that’s part pizza, part celebration cake.
Ingredients
- 2 lbs pizza dough (store-bought or homemade)
- 2 cups pizza sauce
- 4 cups shredded mozzarella cheese
- 1 cup grated Parmesan cheese
- 2 cups sliced pepperoni
- 1 tablespoon olive oil
- 1 teaspoon Italian seasoning
- 1/2 teaspoon garlic powder
- Flour for dusting
- Non-stick cooking spray or butter for greasing
Instructions
- Preheat oven to 400°F (200°C). Grease a tall, deep round cake pan or springform pan with non-stick spray or butter.
- Divide pizza dough into 4–5 equal portions. Roll each portion into a circle to fit the size of your pan.
- Bake each pizza layer on a parchment-lined baking sheet for about 5–7 minutes until lightly golden but not fully cooked. Let cool slightly.
- Place one crust layer into the bottom of the prepared pan. Spread a layer of pizza sauce, sprinkle mozzarella and Parmesan, and top with pepperoni.
- Repeat the layering process with remaining dough, sauce, cheese, and pepperoni, ending with sauce, cheese, and pepperoni on top.
- Brush top with olive oil and sprinkle with Italian seasoning and garlic powder.
- Cover loosely with foil and bake for 25 minutes. Remove foil and bake an additional 10–15 minutes, until cheese is melted and bubbly.
- Let rest for 10 minutes before removing from pan and slicing like a cake.
- Serve warm with extra pizza sauce for dipping.
Notes
- Use a deep springform pan for easy removal and clean layers.
- Try adding other toppings like mushrooms, sausage, or bell peppers between layers.
- Letting the cake rest before slicing helps prevent layers from sliding.
- Perfect for parties or pizza night with a creative twist.
- Prep Time: 20 minutes
- Cook Time: 45 minutes
- Category: Main Dish
- Method: Baked
- Cuisine: Italian-American
Ingredients
(Tip: You can find the complete list of ingredients and their measurements in the recipe card below.)
Pizza Dough
Use store-bought or homemade dough. You’ll need several portions to create the layers—each one baked into a mini pizza crust before stacking.
Pizza Sauce
Classic tomato-based pizza sauce ties all the layers together. You can use marinara or a homemade sauce for a richer flavor.
Mozzarella Cheese
The essential ingredient for that signature cheesy pull. Freshly shredded mozzarella melts more evenly and gives the best texture.
Pepperoni Slices
Crispy, spicy, and irresistible. Layer them generously between each tier and on top for that ultimate pizza finish.
Parmesan Cheese
Adds a salty, nutty bite that enhances the overall flavor of the pizza cake.
Olive Oil
Brush it lightly on the crusts to achieve that golden, crisp finish on every layer.
Italian Seasoning
A blend of oregano, basil, and thyme adds aroma and depth to each layer of your pizza masterpiece.
Fresh Basil
For a burst of color and freshness, scatter chopped basil over the finished cake right before serving.
Egg Wash (optional)
Brushing the outer crust with an egg wash helps achieve a rich, bakery-style sheen when baked.
Directions
- Preheat the oven. Set your oven to 400°F (200°C) and lightly grease a deep, round cake pan.
- Prepare the crusts. Roll out portions of pizza dough into circles that fit your cake pan. Pre-bake each crust for 5–6 minutes until lightly golden. Let them cool slightly.
- Assemble the first layer. Place one crust at the bottom of the pan. Spread pizza sauce evenly, sprinkle mozzarella, add pepperoni, Parmesan, and a pinch of Italian seasoning.
- Add more layers. Repeat with remaining crusts—sauce, cheese, pepperoni—until you’ve stacked three to four layers high.
- Top it off. Finish with a final crust layer, sauce, more mozzarella, and plenty of pepperoni on top.
- Seal the edges. Gently press the sides of the crusts together to prevent leaks. Brush the top with olive oil or egg wash.
- Bake. Place the pan on a baking sheet and bake for 25–30 minutes, or until the top is golden brown and bubbling.
- Cool and serve. Let the pizza layer cake rest for 10 minutes before slicing to keep the layers intact. Garnish with fresh basil and extra Parmesan if desired.
Equipment needed :
Must-Have Tools to Get Rolling
Here’s what you’ll want to have on hand:
Silicone Spatula – Durable, heat-resistant silicone spatula perfect for mixing, scraping, and spreading. Gentle on non-stick cookware and easy to clean.
Large pot – You’ll need this to boil the whole cabbage head and soften the leaves.
large bowl –Spacious, durable large bowl ideal for mixing, serving, or food preparation. Made from sturdy material and easy to clean.
Sharp knife – For coring the cabbage and slicing out the thick stem in each leaf. A paring knife works best.
Mixing bowl – A big bowl makes it easier to combine your meat and rice filling evenly.
Cutting board – For prepping cabbage leaves and rolling them like a pro.
9×13-inch baking dish – Ideal size to fit your rolled cabbage leaves snugly and prevent them from unraveling.
knife – A sharp, durable kitchen knife perfect for slicing, chopping, and dicing with ease
Servings and timing
This recipe serves 6 to 8 people.
Preparation time: 25 minutes
Cooking time: 30 minutes
Total time: 55 minutes
Storage/reheating
Store any leftover slices in an airtight container in the refrigerator for up to 3 days. To reheat, warm slices in the oven at 350°F (175°C) for about 10 minutes or in an air fryer for a crisp texture. Avoid microwaving for too long, as it can make the crust soggy. This dish is best enjoyed fresh from the oven when the cheese is gooey and the edges are crisp.
Variations and Customizations
Supreme Style: Add layers of bell peppers, onions, mushrooms, and sausage for a loaded pizza experience.
Four Cheese Dream: Use a blend of mozzarella, provolone, Parmesan, and ricotta for a richer, creamier texture.
Meat Lover’s Tower: Incorporate layers of bacon, ham, and sausage for a hearty, protein-packed version.
Vegetarian Delight: Skip the pepperoni and load up on roasted veggies like zucchini, mushrooms, and spinach.
BBQ Twist: Replace the tomato sauce with barbecue sauce and top with grilled chicken, red onions, and cheddar cheese.
Spicy Kick: Add crushed red pepper flakes or jalapeños between layers for a little heat.
Breakfast Pizza Cake: Use scrambled eggs, breakfast sausage, and cheddar cheese—perfect for a brunch showstopper.
Garlic Crust Upgrade: Brush each crust with garlic butter before layering for extra flavor.
Mini Version: Make smaller, individual-sized pizza cakes using muffin tins for party servings.
Pesto Perfection: Swap the tomato sauce for basil pesto and top with mozzarella and sun-dried tomatoes.
FAQs
How many layers should a pizza layer cake have?
Typically, 3–4 layers create the perfect balance of crust, cheese, and toppings.
Can I use store-bought dough?
Yes, it works perfectly and saves time—just make sure to pre-bake the layers.
Do I need a special pan?
A deep, round cake pan works best to hold all the layers together.
Can I make this ahead of time?
You can assemble it a few hours ahead and refrigerate, then bake just before serving.
How do I keep the layers from sliding?
Let it cool slightly before slicing, and don’t overload each layer with sauce.
What cheeses melt best?
Mozzarella and provolone offer the perfect stretchy texture and flavor.
Can I freeze leftovers?
Yes, wrap slices tightly and freeze for up to 2 months. Reheat in the oven for best results.
Is there a vegetarian option?
Absolutely—use vegetables and skip the pepperoni for a satisfying meat-free version.
Can I add sauce between every layer?
Yes, but keep it light to prevent sogginess; just a thin spread is ideal.
What should I serve with it?
A crisp green salad or garlic knots balance this rich dish perfectly.
Conclusion
The Pepperoni Pizza Layer Cake is the ultimate indulgence for pizza lovers. It’s bold, fun, and bursting with flavor in every layer. Whether you make it for a family gathering or a special celebration, it’s guaranteed to steal the show. With endless possibilities for customization, this pizza cake is not just a recipe—it’s an experience worth savoring from the very first slice.
Hungry for more? Visit our website for full recipes and follow us on Pinterest for daily foodie inspo you’ll love to pin!