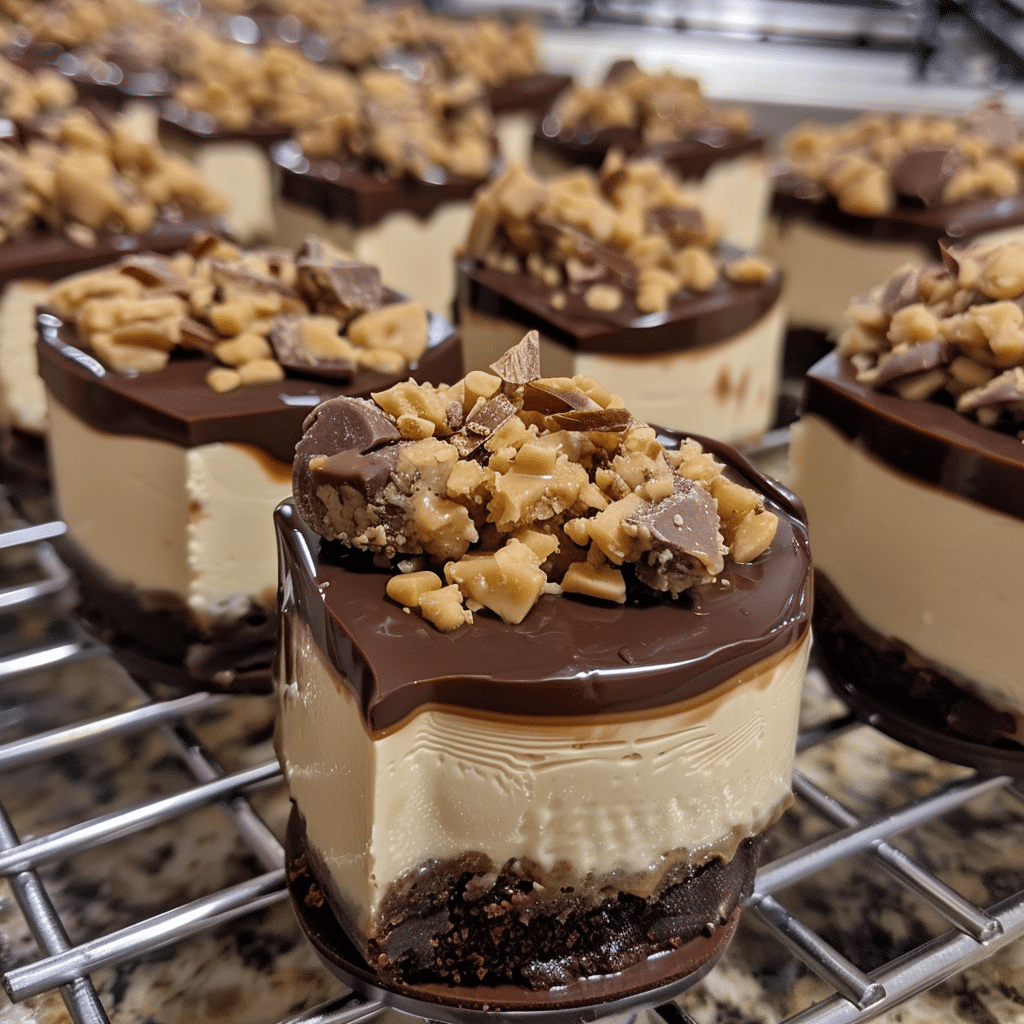
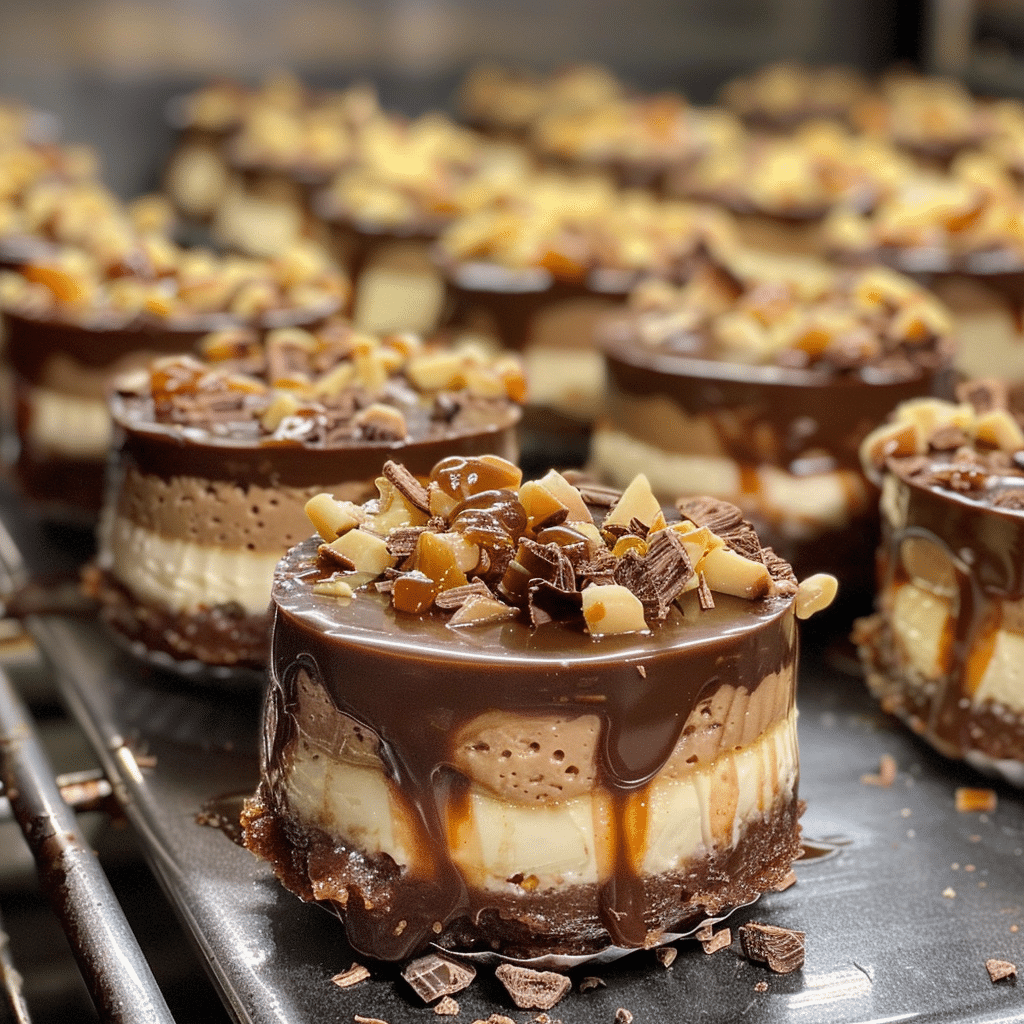
If you’re looking for a dessert that’s bite-sized, creamy, and irresistibly rich, these No-Bake Chocolate Caramel Cheesecake Bites are exactly what you need. They combine smooth chocolate cheesecake with a luscious caramel center, all on a crunchy cookie crust. I first made these for a holiday party, and they disappeared faster than anything else on the table. They’re elegant enough for special occasions yet simple enough for a weeknight treat. No oven, no fuss—just layers of chocolatey, caramel goodness in every single bite. Whether you serve them at parties or keep them stashed in the fridge for personal indulgence, these cheesecake bites deliver the perfect balance of creamy, sweet, and decadent.
Why You’ll Love This Recipe
These cheesecake bites are a dream come true for chocolate and caramel lovers. They’re no-bake, so you don’t have to worry about cracks or water baths, and they come together in just a few easy steps. Each bite offers a symphony of textures—crunchy crust, creamy cheesecake, and gooey caramel. They’re perfectly portioned, easy to serve, and freezer-friendly, making them ideal for entertaining or gifting. If you’ve ever wanted to capture the taste of a chocolate caramel truffle in cheesecake form, this is it.
Print
No-Bake Chocolate Caramel Cheesecake Bites: The Perfect Mini Indulgence
- Total Time: 3 hrs 25 mins (including chilling)
- Yield: 24 bites
- Diet: Vegetarian
Description
Decadent no-bake chocolate caramel cheesecake bites with a buttery Oreo crust, creamy chocolate cheesecake filling, gooey caramel drizzle, and a sprinkle of sea salt — the perfect bite-sized dessert for any occasion.
Ingredients
- 20 Oreo cookies, finely crushed
- 1/4 cup unsalted butter, melted
- 8 oz cream cheese, softened
- 1/3 cup granulated sugar
- 1 teaspoon vanilla extract
- 1/2 cup semi-sweet chocolate chips, melted and slightly cooled
- 1/2 cup heavy cream
- 1/4 cup caramel sauce (plus more for drizzling)
- Sea salt flakes (for garnish)
Instructions
- Line a mini muffin pan with paper liners or lightly grease with nonstick spray.
- In a small bowl, combine crushed Oreo cookies and melted butter. Mix until well combined and resembles wet sand.
- Press about 1 tablespoon of the crust mixture into the bottom of each muffin cup. Chill in the refrigerator while preparing the filling.
- In a large mixing bowl, beat cream cheese, sugar, and vanilla extract until smooth and creamy.
- Add the melted chocolate and mix until fully combined.
- In a separate bowl, whip the heavy cream to soft peaks, then gently fold it into the chocolate cream cheese mixture until smooth.
- Spoon or pipe the cheesecake mixture over the chilled crusts, filling each cup almost to the top.
- Drizzle caramel sauce over each cheesecake bite and sprinkle lightly with sea salt flakes.
- Refrigerate for at least 3 hours or until set. Keep chilled until ready to serve.
Notes
- Use high-quality caramel sauce for the best flavor, or make your own from scratch.
- Top with mini chocolate chips or chopped nuts for extra crunch.
- Store in an airtight container in the refrigerator for up to 4 days.
- These can also be frozen for up to 2 months — thaw in the fridge before serving.
- Prep Time: 25 mins
- Cook Time: 0 mins
- Category: Dessert
- Method: No-Bake
- Cuisine: American
Ingredients
(Tip: You can find the complete list of ingredients and their measurements in the recipe card below.)
Each layer in these cheesecake bites adds its own delicious element. Here’s what makes them so special:
Chocolate cookie crumbs – The base of the bites. Crushed chocolate cookies (like Oreos) create a perfectly rich and crunchy crust that complements the creamy filling.
Butter – Melted butter binds the cookie crumbs together to form the crust. It also adds a subtle richness to the base.
Cream cheese – The star of the filling. Use full-fat, softened cream cheese for the smoothest, creamiest texture.
Powdered sugar – Sweetens the cheesecake mixture without making it grainy.
Melted chocolate – Adds deep, luxurious chocolate flavor and a velvety consistency. Use semi-sweet or dark chocolate for balance.
Whipped topping or heavy cream – Lightens the filling and gives it that luscious, airy texture.
Caramel sauce – The gooey surprise inside. You can use homemade caramel or a store-bought version for convenience.
Sea salt (optional) – A light sprinkle enhances the caramel flavor and adds a touch of sophistication.
Chocolate drizzle (optional) – For finishing touch and a little extra indulgence.
Directions
Start by preparing the crust. Combine the chocolate cookie crumbs with melted butter in a bowl. Mix until the crumbs are evenly coated, then press about a tablespoon of the mixture into the bottoms of a mini muffin pan lined with paper cups. Chill in the refrigerator while you prepare the filling.
In a large mixing bowl, beat the softened cream cheese until smooth. Add powdered sugar and melted chocolate, mixing until well combined. Gently fold in the whipped topping or whipped cream until fully incorporated and light.
Remove the crusts from the fridge and spoon a small amount of cheesecake mixture into each cup, filling halfway. Add a small dollop of caramel sauce in the center, then cover with more cheesecake mixture to conceal the caramel. Smooth the tops with a spatula or the back of a spoon.
Chill for at least 4 hours or until firm. Before serving, drizzle with extra caramel or melted chocolate, and finish with a light sprinkle of sea salt if desired.
Equipment needed :
Must-Have Tools to Get Rolling
Here’s what you’ll want to have on hand:
Silicone Spatula – Durable, heat-resistant silicone spatula perfect for mixing, scraping, and spreading. Gentle on non-stick cookware and easy to clean.
Large pot – You’ll need this to boil the whole cabbage head and soften the leaves.
large bowl –Spacious, durable large bowl ideal for mixing, serving, or food preparation. Made from sturdy material and easy to clean.
Sharp knife – For coring the cabbage and slicing out the thick stem in each leaf. A paring knife works best.
Mixing bowl – A big bowl makes it easier to combine your meat and rice filling evenly.
Cutting board – For prepping cabbage leaves and rolling them like a pro.
9×13-inch baking dish – Ideal size to fit your rolled cabbage leaves snugly and prevent them from unraveling.
knife – A sharp, durable kitchen knife perfect for slicing, chopping, and dicing with ease
Servings and timing
This recipe makes 20–24 cheesecake bites, depending on the size of your molds.
Preparation time: 25 minutes
Chilling time: 4 hours
Total time: 4 hours 25 minutes
Storage/reheating
Store the cheesecake bites in an airtight container in the refrigerator for up to 5 days. For longer storage, freeze for up to 1 month—just thaw in the fridge before serving. Since they’re no-bake, reheating isn’t needed. Serve them chilled for the best texture and flavor.
Variations and Customizations
Peanut Butter Caramel Cheesecake Bites
Add a swirl of peanut butter to the cheesecake mixture for a nutty twist.
Dark Chocolate Espresso Bites
Add a teaspoon of instant espresso powder to the melted chocolate for a deeper, bolder flavor.
Salted Caramel Crunch Version
Top with crushed pretzels or toffee bits for a sweet-and-salty crunch.
Nutty Delight
Add chopped pecans or hazelnuts on top before chilling for extra texture.
Triple Chocolate Dream
Use a chocolate crust, chocolate filling, and a chocolate ganache topping for the ultimate chocolate overload.
Mini Oreo Cheesecake Bites
Swap the caramel for a dollop of crushed Oreos and cream for a cookies-and-cream variation.
White Chocolate Caramel Version
Use melted white chocolate in the filling for a sweeter, creamier flavor.
Vegan Option
Use dairy-free cream cheese, coconut whipped cream, and vegan caramel for a plant-based treat.
FAQs
1. Can I use store-bought caramel sauce?
Yes, it works perfectly. Just make sure it’s thick enough so it doesn’t ooze out before chilling.
2. Can I make these ahead of time?
Absolutely! They’re perfect for preparing a day or two in advance.
3. Can I use a regular muffin tin?
Yes, but you’ll get fewer, larger portions—more like mini cheesecakes.
4. How do I remove the bites easily from the pan?
Using paper liners or silicone molds makes removal effortless.
5. Can I use milk chocolate instead of dark?
Yes, though it will make the bites sweeter.
6. How do I prevent the caramel from leaking?
Make sure to chill the first cheesecake layer before adding the caramel, or use thick caramel sauce.
7. Can I skip the crust?
You can, but the crust adds structure and contrast to the creamy filling.
8. How long do they need to chill?
At least 4 hours for the best texture, or overnight for a firmer bite.
9. Can I use cocoa powder instead of melted chocolate?
Not recommended—it won’t give the same creamy consistency.
10. How should I serve them?
Serve chilled with a drizzle of caramel or chocolate and a sprinkle of sea salt for presentation.
Conclusion
These No-Bake Chocolate Caramel Cheesecake Bites are pure decadence in miniature form—creamy, rich, and perfectly portioned. With a chocolate cookie crust, smooth cheesecake center, and gooey caramel surprise, every bite is a little piece of dessert heaven. They’re elegant enough for parties and easy enough for everyday indulgence. Make a batch for your next gathering—or keep them all for yourself. Either way, these bites deliver the perfect balance of chocolate and caramel in one irresistible, creamy treat.
Hungry for more? Visit our website for full recipes and follow us on Pinterest for daily foodie inspo you’ll love to pin!