
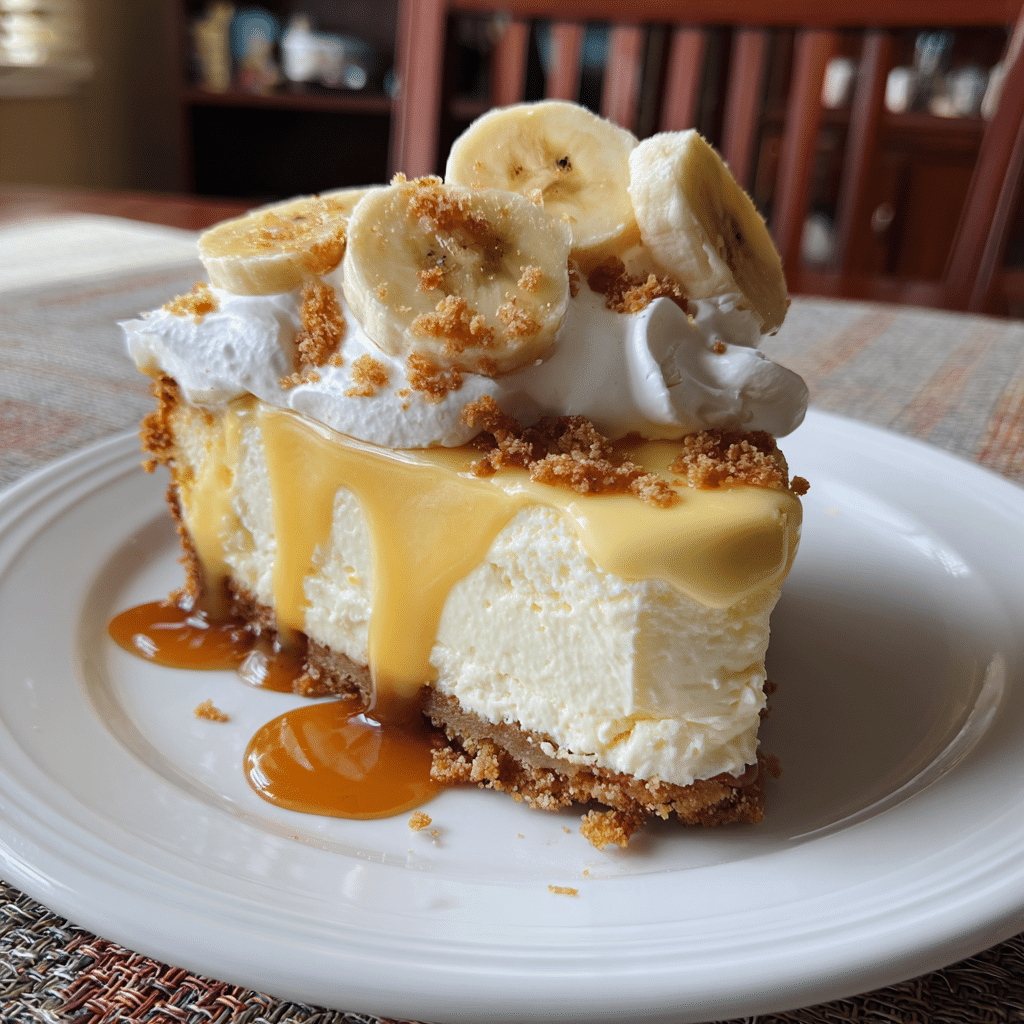
This Banana Pudding Cheesecake combines two Southern classics — creamy banana pudding and rich, velvety cheesecake — into one irresistible dessert. With a buttery vanilla wafer crust, a smooth banana-flavored cheesecake filling, and layers of fresh bananas and whipped topping, it’s as comforting as it is decadent. I once made this for a family gathering and added a drizzle of caramel on top — it disappeared within minutes! This dessert has the perfect balance of nostalgia and indulgence, making it a true showstopper for holidays, parties, or anytime you crave something special.
Why You’ll Love This Recipe
If you love banana pudding, this cheesecake will take it to another level. It’s creamy, luscious, and packed with flavor — from the buttery vanilla wafer crust to the smooth banana cheesecake and whipped topping. Each layer complements the next, creating the ultimate comfort dessert. It looks impressive but is surprisingly simple to make, and it tastes even better the next day after chilling. It’s the kind of dessert that brings smiles to every table.
Print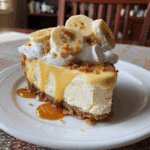
Banana Pudding Cheesecake – Creamy, Dreamy, and Irresistible
- Total Time: 1 hr 25 mins (plus chilling)
- Yield: 10 servings
- Diet: Vegetarian
Description
This Banana Pudding Cheesecake combines two beloved desserts into one irresistible treat — creamy banana-flavored cheesecake layered with vanilla wafers, fresh bananas, and luscious whipped topping. It’s smooth, rich, and full of Southern charm — perfect for holidays, potlucks, or any sweet celebration.
Ingredients
- 1 1/2 cups vanilla wafer crumbs
- 1/4 cup granulated sugar
- 1/3 cup unsalted butter, melted
- 3 (8 oz) packages cream cheese, softened
- 1 cup granulated sugar
- 3 large eggs
- 1/2 cup sour cream
- 1/2 cup mashed ripe banana (about 1 large banana)
- 1 (3.4 oz) package instant banana pudding mix
- 1 tsp vanilla extract
- 1 cup heavy whipping cream
- 2 tbsp powdered sugar
- 1 fresh banana, sliced (for topping)
- Crushed vanilla wafers (for garnish)
Instructions
- Preheat oven to 325°F (160°C). Grease a 9-inch springform pan and line the bottom with parchment paper.
- In a bowl, combine vanilla wafer crumbs, granulated sugar, and melted butter. Press firmly into the bottom of the pan to form the crust. Bake for 10 minutes, then let cool.
- In a large mixing bowl, beat cream cheese and sugar together until smooth and creamy.
- Add eggs one at a time, beating after each addition. Then mix in sour cream, mashed banana, pudding mix, and vanilla extract until fully combined.
- Pour the batter over the cooled crust and smooth the top.
- Bake for 55–65 minutes, or until the center is almost set (it should jiggle slightly). Turn off the oven, crack the door open, and let the cheesecake cool inside for 1 hour.
- Remove from oven and refrigerate for at least 4 hours, preferably overnight.
- In a separate bowl, whip heavy cream and powdered sugar until stiff peaks form. Spread over the chilled cheesecake.
- Top with banana slices and crushed vanilla wafers just before serving.
Notes
- Use ripe bananas for the best flavor and natural sweetness.
- To prevent cracking, avoid overmixing the batter and let the cheesecake cool gradually.
- For a shortcut, use a store-bought graham cracker crust and make it as a no-bake cheesecake (skip baking steps).
- Keep refrigerated and consume within 3 days for the freshest taste.
- Prep Time: 25 mins
- Cook Time: 1 hr
- Category: Dessert
- Method: Baked
- Cuisine: American
Ingredients
(Tip: You can find the complete list of ingredients and their measurements in the recipe card below.)
Vanilla Wafers – Crushed for the crust, they add that signature banana pudding flavor and buttery crunch.
Butter – Melted and mixed with the wafers to form the crust.
Cream Cheese – The base of the cheesecake; ensure it’s softened for a smooth texture.
Sugar – Sweetens the cheesecake without overpowering the banana flavor.
Banana Pudding Mix – Instant banana pudding adds both flavor and structure.
Eggs – Provide richness and help the cheesecake set perfectly.
Sour Cream – Adds tang and creaminess for a silky-smooth texture.
Vanilla Extract – Enhances flavor and balances the sweetness.
Ripe Bananas – Sliced fresh bananas bring authentic flavor and texture.
Whipped Topping or Whipped Cream – For the creamy top layer.
Vanilla Wafers (for garnish) – Crushed or whole for that classic banana pudding finish.
Directions
Prepare the Crust
Preheat your oven to 325°F (160°C).
In a bowl, combine crushed vanilla wafers and melted butter. Mix until the texture resembles wet sand.
Press the mixture firmly into the bottom of a 9-inch springform pan. Bake for 10 minutes, then let it cool while preparing the filling.
Make the Cheesecake Filling
In a large mixing bowl, beat cream cheese and sugar until smooth and creamy. Add banana pudding mix and mix until fully incorporated.
Add the eggs, one at a time, mixing on low speed until just combined (do not overmix).
Stir in sour cream and vanilla extract until smooth.
Pour half of the batter over the cooled crust. Arrange a layer of sliced bananas on top, then pour in the remaining batter to cover. Smooth the surface.
Bake the Cheesecake
Place the springform pan in a larger pan and add hot water halfway up the sides to create a water bath.
Bake for 60–70 minutes until the edges are set but the center still jiggles slightly.
Turn off the oven, crack the door open, and let the cheesecake cool inside for 1 hour to prevent cracking.
Remove from the oven and refrigerate for at least 4 hours, preferably overnight.
Assemble and Serve
Once chilled, spread whipped topping over the top of the cheesecake. Garnish with sliced bananas and crushed vanilla wafers before serving.
For extra indulgence, drizzle with caramel or white chocolate sauce.
Equipment needed :
Must-Have Tools to Get Rolling
Here’s what you’ll want to have on hand:
Silicone Spatula – Durable, heat-resistant silicone spatula perfect for mixing, scraping, and spreading. Gentle on non-stick cookware and easy to clean.
Large pot – You’ll need this to boil the whole cabbage head and soften the leaves.
large bowl –Spacious, durable large bowl ideal for mixing, serving, or food preparation. Made from sturdy material and easy to clean.
Sharp knife – For coring the cabbage and slicing out the thick stem in each leaf. A paring knife works best.
Mixing bowl – A big bowl makes it easier to combine your meat and rice filling evenly.
Cutting board – For prepping cabbage leaves and rolling them like a pro.
9×13-inch baking dish – Ideal size to fit your rolled cabbage leaves snugly and prevent them from unraveling.
knife – A sharp, durable kitchen knife perfect for slicing, chopping, and dicing with ease
Servings and timing
This recipe serves 10–12 people.
Preparation time: 20 minutes
Cooking time: 1 hour 10 minutes
Cooling and chilling time: 5 hours
Total time: About 6½ hours
Storage/reheating
Store the cheesecake covered in the refrigerator for up to 5 days. Avoid freezing, as the bananas can discolor and affect the texture. For best results, add fresh bananas and whipped topping just before serving.
Variations and Customizations
Caramel Banana Cheesecake
Drizzle caramel sauce over the top for added sweetness and shine.
Chocolate Banana Cheesecake
Add a layer of chocolate ganache between the crust and cheesecake for a richer twist.
Peanut Butter Banana Cheesecake
Swirl a spoonful of creamy peanut butter into the batter before baking.
Mini Cheesecake Cups
Bake the cheesecake mixture in muffin tins with vanilla wafer bases for individual servings.
No-Bake Version
Skip the eggs and bake time — use whipped cream cheese and banana pudding mix for an easy no-bake option.
Nutty Crunch
Add chopped pecans or walnuts to the crust for a toasty crunch.
Coconut Banana Cheesecake
Mix shredded coconut into the crust or top with toasted coconut flakes.
Lemon Zest Twist
Add a bit of lemon zest to the filling to brighten the banana flavor.
Biscoff Crust
Replace vanilla wafers with Biscoff cookies for a caramelized flavor variation.
Layered Pudding Cheesecake
Add a thin layer of banana pudding between the cheesecake and whipped topping for extra creaminess.
FAQs
Can I use homemade banana pudding?
Yes, just make sure it’s thick and cool before adding it to the batter.
Can I skip the water bath?
You can, but the water bath helps prevent cracks and keeps the cheesecake moist.
How do I know when it’s done baking?
The edges should be set, and the center should still have a slight jiggle.
Can I make this ahead of time?
Yes, it’s best made a day before serving to allow flavors to develop.
Can I use graham crackers instead of vanilla wafers?
Absolutely — graham crackers give a more traditional cheesecake crust flavor.
How do I keep the bananas from browning?
Brush them lightly with lemon juice before layering or garnishing.
Can I use boxed pudding that isn’t banana-flavored?
Yes, vanilla pudding works too for a subtler banana flavor.
What’s the best way to cut clean slices?
Use a sharp knife dipped in hot water and wipe it clean between cuts.
Can I add whipped cream instead of topping?
Yes, freshly whipped cream adds a light, fluffy finish.
What should I serve with it?
A drizzle of caramel, chocolate sauce, or a scoop of vanilla ice cream complements it beautifully.
Conclusion
This Banana Pudding Cheesecake is a dreamy dessert that perfectly blends the comforting flavor of banana pudding with the creamy richness of cheesecake. With its buttery crust, velvety filling, and layers of bananas and whipped cream, it’s a treat that feels both nostalgic and luxurious. Perfect for gatherings or special occasions, this dessert is sure to impress and satisfy every sweet craving. Once you take your first bite, you’ll understand why this recipe is an instant classic.
Hungry for more? Visit our website for full recipes and follow us on Pinterest for daily foodie inspo you’ll love to pin!